Setting up a double opt-in to manage user consent with Vero Workflows
-
TutorialsUpdatedPosted:

On this page
What does it mean to ‘double opt-in’?
Double opt-in means asking new subscribers to confirm they want to receive your emails (or other messages) twice, so there is no ambiguity.
Typically, this means asking them to fill out a form or tick a confirmation box on your website AND click a link in a follow-up email or SMS message. This enables you to confirm that a new subscriber definitely wants to receive your messages, as well as to verify the email address or phone number belongs to them.
While it is always required that you ask your customers to consent to receive your messages affirmatively, it is not always required to implement a double opt-in. Despite this, adding a double opt-in both respects your customers’ privacy and ensures that you only message engaged users. It is also an effective way to ensure that users have entered their email address or phone number correctly and to prevent spammers from signing up with email accounts they do not own.
How to set up a double opt-in email message
In this tutorial, we will show you how you can use Vero’s Workflows to set up a double opt-in message.
-
Step 1
User subscribes to your messages
-
Step 2
User recieves a confirmation email
-
Step 3
User clicks email confirmation link
-
Step 4
User double opt-in completed
For this example, we’ll be using email for our confirmation message, but you could use any messaging channel (such as SMS, mobile push notifications).
Step 1: Create a form so users can subscribe to your messages
-
Step 1
User subscribes to your messages
-
Step 2
User recieves a confirmation email
-
Step 3
User clicks email confirmation link
-
Step 4
User double opt-in completed
The most common way to enable users to subscribe to your messages is to use a form on your website. Vero HTML forms allow you to add subscribers directly to your Vero account.
To create a form, log in to Vero and head to “Forms”. Select “New Form” and add the fields you want to your form. Each field represents the information you want to know about your new subscribers, and the value of each field is stored in Vero against that subscriber’s unique profile. In Vero, we call these fields “user properties”.

In this example, we’ll keep things simple and just ask our new subscribers for their “First name”. Note: if you have created a user property in Vero before, you simply select the property on the left-hand side to add it to your form.
When a user fills out the form, their first name and email will be automatically added to your Vero account. The form will also trigger an ‘event’, describing the action the user just took. You can decide the name for the event, in this example, we’ll name our event “Subscribed to blog”.
‘Events’ are a powerful way of tracking user behavior. Vero’s forms and APIs use events to enable you to track important customer lifecycle activity. These events can be used to automate workflows and the messages your customers see.
Learn more about Event tracking.
Once you’re happy with your form, select “Generate Form” and Vero will provide the HTML code so that you can add the form to your website.
Step 2: Trigger the double opt-in confirmation email
-
Step 1
User subscribes to your messages
-
Step 2
User recieves a confirmation email
-
Step 3
User clicks email confirmation link
-
Step 4
User double opt-in completed
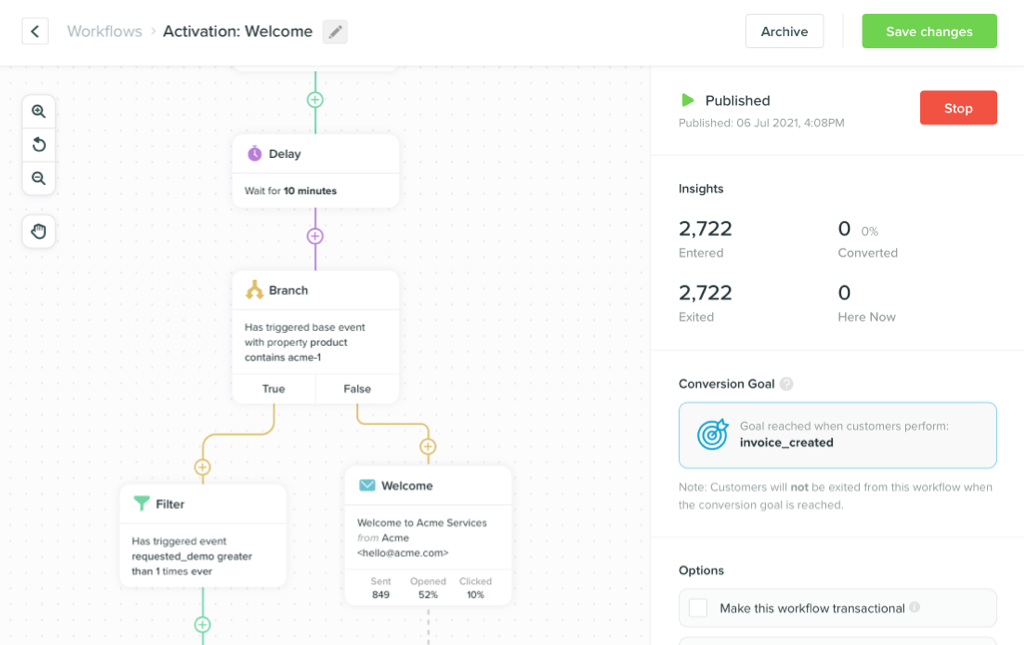
Now users can successfully subscribe to your messages we’ll use Vero’s Workflows feature to automate a follow-up email asking them to confirm their subscription status – in other words: to double opt-in.
Workflows empower you to create powerful automations that reduce busywork and co-ordinate your customers’ experiences with your business.
To begin, create a new workflow in your Vero account and set up the trigger. All Workflows are triggered by ‘events’, so we’ll use the event we set up in Step 1 called “Subscribed to blog”.
Each time the form (created in Step 1) is filled out, the user’s
details will be passed to this Workflow. Adding an email step
directly under the Entry Trigger in the workflow will
automatically send a message to the user when they submit the
form.
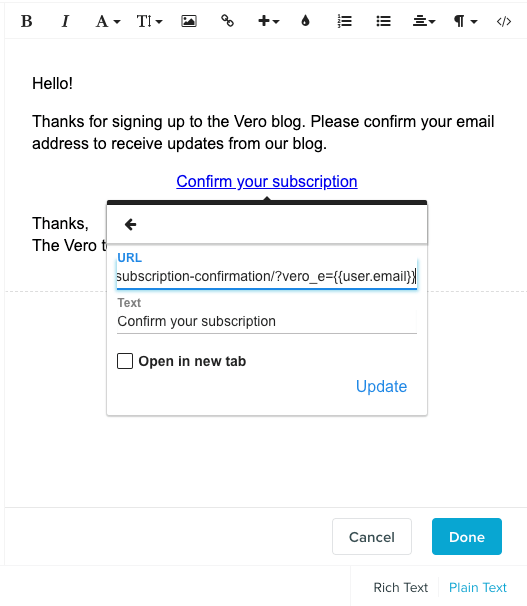
Inside the content of this email, you should include a clear call to action, for example, “Confirm my subscription”. This CTA link should direct users to a landing page that confirms the subscription was successful.
We’ll also use this landing page to track and update the double
opt-in status of the user in Step 3. To ensure Vero knows which
user has clicked the link in the email, it’s important to append a
parameter to the end of your URL called “vero_e” with
the user’s email address. In this example, we link to the
following confirmation page, including the “vero_e”
parameter which is dynamically filled with the user’s email, when
Vero sends the confirmation message:
https://www.getvero.com/resources/vero-email-subscription-confirmation/?vero_e={{user.email}}Here’s a screenshot showing this in detail:
Step 3: Update the subscriber’s confirmation status
-
Step 1
User subscribes to your messages
-
Step 2
User recieves a confirmation email
-
Step 3
User clicks email confirmation link
-
Step 4
User double opt-in completed
When a new subscriber gets the email (created in Step 2) and clicks the confirmation link, they’ll land on your dedicated confirmation landing page. Here’s an example of how this works:

In this final step, we must update the user’s subscription status in Vero to confirm their double opt-in to receive messages. To do this, we recommend using Vero’s Javascript library to update the subscriber’s properties in Vero.
To make things simpler, we like to use Google Tag Manager. Using Google Tag Manager, you can load Vero’s Javascript library and update the subscriber’s property in Vero in one single step. To set up tracking for this example, follow these steps:
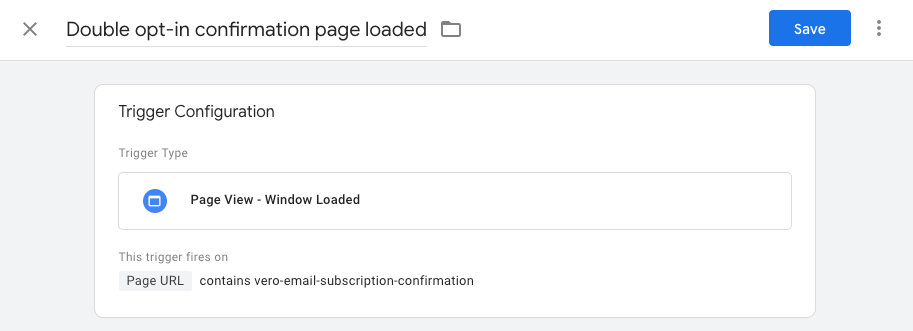
Firstly, create the Trigger that will fire your Javascript. In this case, we want our Javascript to fire only on the dedicated opt-in landing page. Note: in our case, the URL of our double opt-in landing page is “https://www.getvero.com/vero-email-subscription-confirmation”, so our Trigger uses the string “vero-email-subscription-confirmation”. Make sure you change this to match the URL of your own landing page.
Secondly, create the Tag and add the Javascript you want to fire on the dedicated opt-in page.
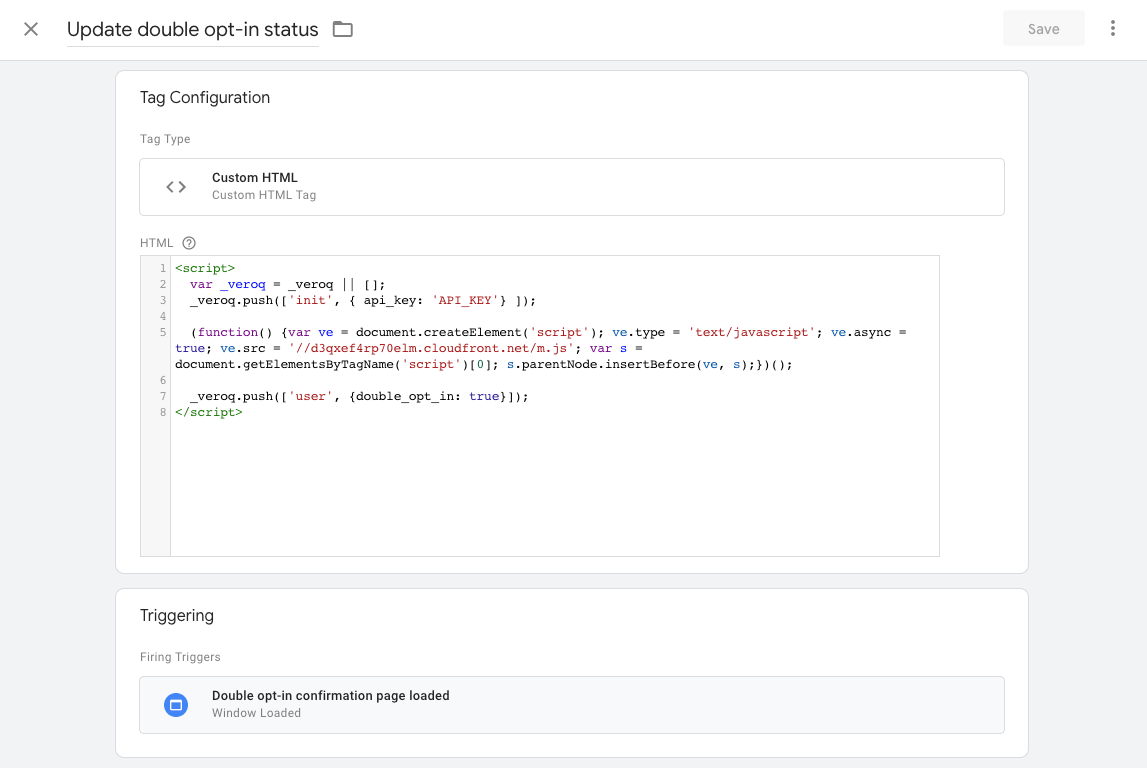
We’ve included below the basic Javascript you’ll need to track the double opt-in. This Javascript updates a user property called “double_opt_in”, setting its value to “true”. By default, any user added to Vero using the form (in Step 1) will not have this property set on their profile. When a user clicks the confirmation link and lands on this page, their property will be updated. This allows us to then segment out those customers who have double opted-in, from those who have not (as described in Step 4).
Don’t forget! You will need to replace the value of “API_KEY” with a valid API key from your Vero account. You can find and generate API Keys under Settings > Project Details.
<script>
var _veroq = _veroq || [];
_veroq.push(['init', { api_key: 'API_KEY'} ]);
(function() {var ve = document.createElement('script'); ve.type = 'text/javascript'; ve.async = true; ve.src = '//d3qxef4rp70elm.cloudfront.net/m.js'; var s = document.getElementsByTagName('script')[0]; s.parentNode.insertBefore(ve, s);})();
_veroq.push(['user', {double_opt_in: true}]);
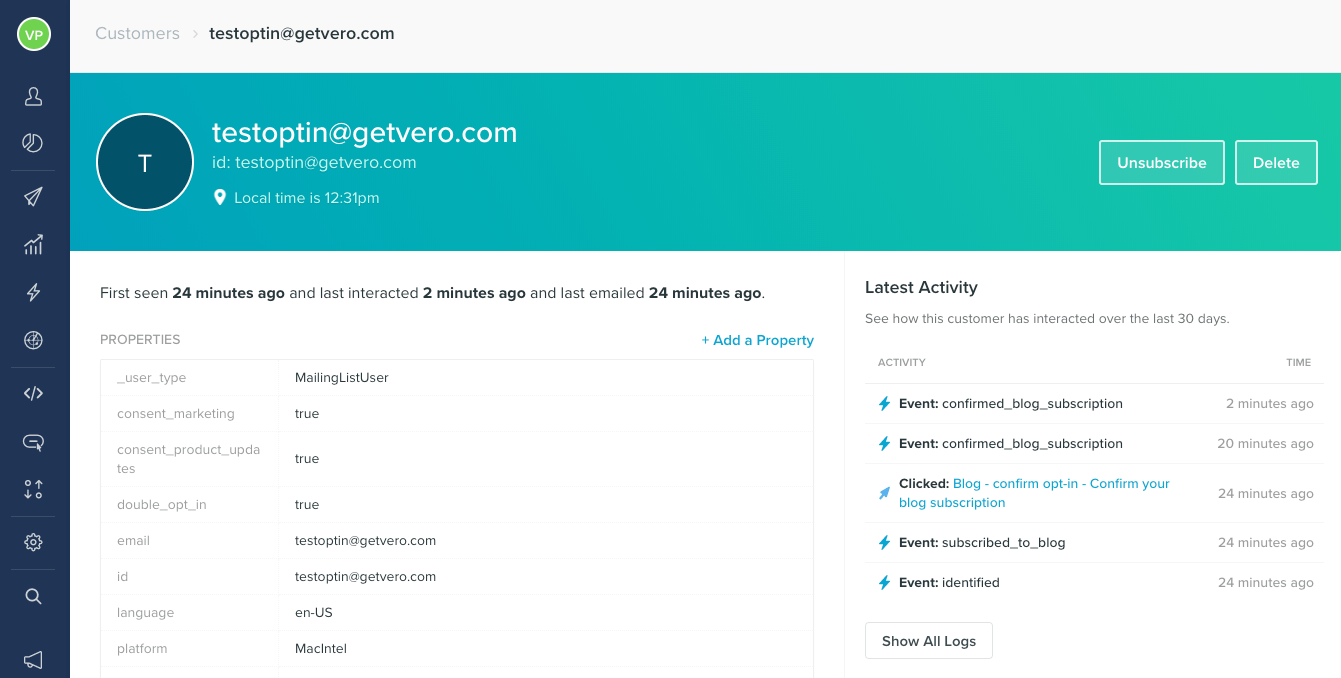
</script>To see that it works, click on your link and check that the property in Vero is correctly set up on your test user.
Step 4: Ensure you only email subscribers that have double opted-in
Now that subscribers can sign up and confirm their subscription status with a double opt-in, it is vital to ensure you only email those subscribers that have confirmed their subscription status.
To do this in Vero create a Segment that filters out only those users who have not confirmed their subscription. To do this, create a new segment and add a filter based on the user property we configured in Step 3, “double_opt_in”. In this segment, we will include only those users who have this property set to “true”.
Whenever you create a Newsletter or a Workflow in the future you need to include this segment to ensure only users who have double opted-in to receive your messages.

Get started with Vero today – Start your free trial
Want to send more personalized mobile and email messages to your users?
Learn moreCustomer story

How Vero helps Dribbble take full advantage of their customer data to improve personalization