- All Posts
- /
- How to Send Onboarding Emails Automatically
How to Send Onboarding Emails Automatically
Alternatives-
 Chris Hexton
-
Updated:Posted:
On this page
Most onboarding email sequences are glorified drips. They fire on day one, day three, and day seven — regardless of what the user has done. The person who already activated your product gets the same "here’s how to get started" email as the person who never logged in again.
That’s not automation. That’s a scheduled broadcast with personalization tokens.
The difference between a drip and genuine onboarding automation is this: a drip runs on a clock. Real automation runs on what your users actually do. And welcome sequences outperform batch campaigns — with up to 4x higher open rates and 5x higher click-through rates.
This guide walks through exactly how to build and send onboarding emails that fire automatically based on user behavior — from event tracking to live sequences, with specific steps for each stage.
What "automatic" actually means
There are two ways to send onboarding emails "automatically."
Time-based drips fire on a fixed schedule from signup — Email 1 immediately, Email 2 on day 2, Email 3 on day 5. The logic is simple. The problem is that the timing has nothing to do with what the user is doing.
Behavior-triggered sequences fire when something happens — or fails to happen. When a user connects their first integration, send the integration guide. When they haven’t logged in for 48 hours, send the re-engagement email; when they complete setup, skip the setup reminder entirely.
Behavior-triggered automation requires more setup upfront but delivers meaningfully better results. Userpilot benchmark data shows that users who don’t engage in the first three days have a 90% chance of churning. Getting the right message in front of someone at the right moment — based on what they did, not what day it is — is the difference between activation and abandonment.
This guide builds a behavior-triggered sequence.
What you need before you start
Before you write a single subject line, three things need to be in place.
A messaging platform with behavioral triggers. You need a platform that can listen for events from your product and fire emails based on them. Not just time delays — actual event triggers. This is the core capability you’re building on.
Event tracking in your product. Your messaging platform needs to receive signals from your product. When a user signs up, logs in, completes setup, invites a team member, or goes idle — your product needs to send that signal somewhere the messaging platform can hear it.
A clear definition of "activated." Onboarding automation exists to move users from signup to activation. You need to define what activation means for your product before you build. This is your north star event — the action that signals a user has experienced real value.
Once you have these three things, the rest is implementation.
Step 1: Define your activation event
Every onboarding sequence should pull users toward one specific moment. Not several. One.
This is your activation event — the action most tied to long-term retention in your product. For a SaaS analytics tool it might be "created first dashboard," for a collaboration app "invited a second user," and for an email platform "sent first campaign."
The activation event is different from the signup event. Signing up is easy. Activation requires intent and effort — it’s the first moment the user gets real value.
To find yours: look at your retained users and identify the earliest action they all have in common. That’s your activation milestone. Everything in your onboarding sequence exists to bring new users to that same moment.
Write it down as a specific, trackable event. Not "users
understand the product" — that’s unmeasurable. Something like
campaign_sent or
integration_connected or
first_report_created. Concrete, binary, trackable.
Step 2: Map your email sequence
Most sequences that move activation metrics run between four and six emails over 14 to 21 days. Here’s the core sequence:
- Email 1: Welcome — immediate, sent the moment someone signs up. Sets expectations, introduces the product, and gives one clear next step. One action. Not five.
- Email 2: Setup prompt — sent 24 hours after signup if the user hasn’t completed setup. Addresses the most common early friction point.
- Email 3: Feature education — sent after the user completes setup. Introduces a high-value feature they haven’t tried yet.
- Email 4: Milestone celebration — sent when the user hits their activation event. Confirms they’ve done it. Points them toward the next thing.
- Email 5: Trial urgency (if applicable) — sent 3–4 days before trial ends. Focuses on value already received and what they’d lose.
- Email 6: Re-engagement — sent if the user goes 48–72 hours without logging in at any stage. Asks a simple question: "Is something blocking you?"
Two things to note: Email 4 only fires when the user activates — so users who activate quickly might receive it on day 1, while slower users receive it on day 10. That’s correct behavior. The milestone email should always follow the milestone, not the calendar.
And Email 6 is a branch, not a sequential step. It runs in parallel, watching for inactivity.
Step 3: Track your events
Your messaging platform can’t trigger emails on product behavior unless it’s receiving that behavior as events. This is the technical prerequisite — and the step most teams skip or underbuild.
For each email trigger in your sequence, identify the corresponding product event:
| Trigger event | |
|---|---|
| Welcome | user_signed_up |
| Setup prompt | 24hr timer IF setup_not_completed |
| Feature education | setup_completed |
| Milestone celebration | [your_activation_event] |
| Trial urgency | X days before trial_ends_at |
| Re-engagement | 48hr timer IF no_login_event |
Track these events through your product’s backend. When a user
completes signup, your server fires a
user_signed_up event with properties like
email, name, plan, and
signup_source. When they complete setup, fire
setup_completed; when they hit activation, fire
[your_activation_event].
Properties matter. A campaign_sent event with
properties like campaign_type: "welcome" and
recipient_count: 1500 lets you personalize the
milestone email: "Congrats — your first campaign just went to
1,500 people." Without properties, you can confirm the action
happened but can’t speak to it specifically.
Use your platform’s API or SDK to send these events from your backend. Most platforms accept a simple POST request with the event name, user ID, and a properties object.
Step 4: Build the automation in your platform
With events tracking, you’re ready to build the actual sequence.
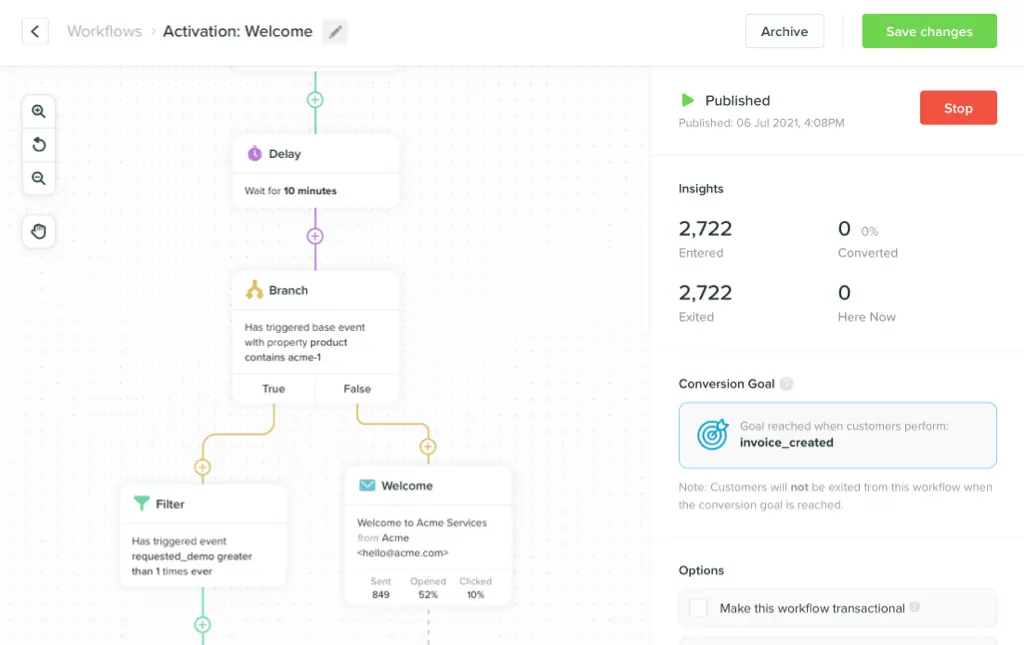
In Vero, this lives in the
workflow builder. You start with a trigger event —
user_signed_up — and add the first email
immediately after. Then you add a delay, a condition check, and
the next step based on the outcome.
Here’s how the setup prompt branch works: after the welcome
email, add a 24-hour delay, then check "Has the user fired
setup_completed?" If yes — skip the prompt and move
to feature education. If no — send the setup prompt, then wait
for setup_completed before continuing.
This is the fundamental pattern of behavioral onboarding automation: delay → condition check → branch. Users who move fast skip the friction-reduction emails. Users who stall receive them exactly when they’re most useful.
The re-engagement branch runs independently. Set up a parallel branch from signup: "If no login event in 48 hours at any point before activation, send re-engagement email." This watch condition runs in the background while the main sequence progresses.
Build the flow visually first — map every branch before you create templates. It’s much easier to spot logic gaps in a diagram than in a list of automation rules.
Step 5: Write the emails
Each email in the sequence should do exactly one thing — one feature, one action, one link.
The moment you combine two goals in one email, click-through drops — the reader doesn’t know which action is the right one. Research consistently shows that onboarding emails with a single CTA get 3x more clicks than emails with multiple options.
For each email, write to this structure:
- Subject line — specific, not clever. "Set up your first integration" outperforms "The key to getting started."
- Opening line — acknowledge what just happened. "You signed up" or "You just [completed X]."
- Body — one paragraph of context. Why does this matter to them?
- CTA — one button, one action, one destination.
- PS (optional) — a secondary link to documentation, support, or a use case example.
Personalize with event data where it’s genuinely useful — "Your trial ends in 4 days" beats "Your trial is ending soon," and "You’ve sent 3 campaigns" beats "You’ve been using the platform." Pull the properties from your tracked events and use them.
Keep emails short. The welcome email should take under 60 seconds to read; the setup prompt should be even shorter — it exists to remove one specific friction point. Length is the enemy of action.
Step 6: Use personalization to branch by user type
Not all new users arrive with the same context. A founder who signed up after a demo knows the product differently from someone who found you organically.
Capture the signup source as an event property and use it to adjust your welcome email. Someone who came from a demo gets a "here’s how to get the thing we showed you set up" email. Someone who came from organic search gets "here’s how to get the most value quickly."
You can also branch by plan type, team size, or role. A user who signed up on a team plan gets nudged to invite teammates. A solo user gets nudged toward the features that work best solo.
Keep branches simple at first — one or two conditions is manageable, five is chaos. Start with the highest-impact segmentation, usually signup source or plan type. Add more as you learn what actually changes behavior.
Step 7: Set suppression rules
Automation without suppression creates bad experiences. A user who upgrades on day 2 should not receive the trial urgency email on day 12.
Set up these suppression rules before going live:
-
Stop all onboarding emails when a user converts.
Add a global exit condition: "If user fires
subscription_started, exit this workflow." - Stop the setup prompt once setup is complete. If a user completes setup after the prompt has already been scheduled but not yet sent, cancel it.
- Stop re-engagement if the user logs in. If the 48-hour inactivity email is queued but the user logs back in before it fires, cancel it.
Suppression rules feel like edge-case housekeeping — they’re not. They’re the difference between an onboarding sequence that feels intelligent and one that feels robotic. Users notice when they receive an email that contradicts their actual experience.
Step 8: Test before you go live
Test your automation end-to-end with real accounts before any real user touches it.
Create three test accounts that represent different user paths: one who activates quickly, one who stalls at setup, and one who goes completely inactive. Walk each account through the sequence manually by firing events from your backend and checking what emails arrive.
Verify the following for each path:
- Emails fire in the right order
- Delays are correct (24 hours is 24 hours — not 24 days)
- Branching works: fast-activating users skip setup prompts
- Suppression works: the converted user stops receiving onboarding emails
- Personalization tokens resolve correctly — no "Hi {{first_name}}" in production
Also check deliverability: confirm emails aren’t landing in spam, that your sending domain is authenticated (SPF, DKIM, DMARC), and that your sending IP reputation is clean.
Step 9: Monitor and improve
Your automation is live. Now you measure.
The primary metric is your activation rate — the percentage of signups that reach your activation event within a defined window, typically 14 or 30 days. The median SaaS activation rate sits around 37%. Your onboarding sequence is working if you’re moving that number up over time.
For each email in the sequence, track:
- Open rate — a signal of subject line and timing quality
- Click rate — a signal of email relevance and CTA clarity
- Conversion rate — the percentage who complete the action the email was pointing to
When an email has a high open rate but low click rate, the content isn’t landing. When it has a low open rate, the subject line or timing is off. When click rate is high but conversion is low, the friction is in the product, not the email.
Iterate one variable at a time. Change the subject line, let it run for two weeks, then measure. Change the send timing, let it run, then measure. Onboarding automation is never finished — it improves continuously as you learn.
Frequently asked questions
How many emails should an onboarding sequence have? Most effective SaaS onboarding sequences run four to six emails over 14 to 21 days. Simple products with fast time-to-value may need only three. Complex products with long learning curves sometimes extend to 10 or more over 30 days. Start with four to six and add only when data shows a specific gap in the flow.
Should I use time-based or behavior-triggered emails? Behavior-triggered whenever possible. Time-based emails create a fixed experience regardless of what a user has done. Behavior-triggered emails adapt to actual user progress. The best sequences use a combination: triggered emails fire when events happen, and time-based fallbacks catch users who go quiet.
What’s the ideal timing for the welcome email?
Immediate. The welcome email should fire within seconds of
signup.
Research shows
that delayed welcome emails see open rates drop by 50% or more
compared to instant delivery. Set your trigger to fire the
moment user_signed_up is received — no delay.
How do I avoid sending emails to users who already activated? Set a global exit condition on your workflow: when a user hits your activation event or converts to paid, exit the onboarding sequence. Add this as the first condition in every decision node in your automation. This is not optional — without it, converted users receive emails that contradict their experience.
What events should I track as a minimum? At
minimum: user_signed_up, your setup completion
event, your activation event, user_logged_in, and
your conversion event (e.g., subscription_started).
With just these five events, you can build a branching
onboarding sequence that adapts to fast activators, slow
activators, and churned users without any manual intervention.
How do I measure whether my onboarding emails are working? Track activation rate (signups that reach your activation event within 14 or 30 days) as the primary metric. Email-level metrics — open rate, click rate, conversion — tell you which specific emails are working and which need improvement. Benchmark your activation rate before launching the sequence so you have a clean before/after comparison.
Build your onboarding automation with Vero
Sending onboarding emails automatically is not about setting up more drips. It’s about building a system that responds to what users actually do — and gets out of the way when they don’t need it.
Disclosure: Vero is our own product. We’ve included it because we genuinely believe it belongs in this conversation — but you should know we’re not a neutral party.
Vero is built specifically for this. Event-triggered workflows, behavioral branching, suppression rules, real-time personalization — all in a visual journey builder that your messaging team can own without an engineer on every change.
You can connect your product events to Vero via API in an afternoon. The visual workflow builder lets you map the full sequence — branches, conditions, delays, and all — before a single email goes live.
Start your free trial and send your first automated onboarding sequence within days, not weeks. No credit card required.