- All Posts
- /
- How to Build an Onboarding Email Flow Based on User Actions
How to Build an Onboarding Email Flow Based on User Actions
Messaging and Automation-
 Chris Hexton
-
Updated:Posted:
On this page
Most onboarding emails follow a schedule, not a user. Day one, day three, day seven — the sequence fires regardless of what the user has done. Someone who activated on day one gets the same "here’s how to get started" email as someone who never logged back in.
That mismatch doesn’t just underperform. It signals to users that your product isn’t paying attention. And in the first week — when habits form and the retention decision crystallizes — that signal carries real weight.
Action-based onboarding fixes this. Each email fires based on what a user did or didn’t do inside your product. Complete a step and the flow adapts; go quiet and it nudges you back.
The result is higher activation and lower churn — not because the emails are cleverer, but because they’re timely. This guide walks through how to build a behavioral onboarding flow from scratch. Follow these steps and you’ll have a working flow running on real product data.
Why onboarding flows fail
Time-based sequences feel logical to build. You map out a journey, assign a day to each message, and let the automation run. But the schedule knows nothing about what a user actually did — and most users don’t follow your ideal path.
The disconnect compounds over time. A user who activated on day two still gets the day-three setup prompt; a user who churned on day one still gets the day-seven feature highlight. Each misfire reinforces the idea that your product treats every user as identical.
Behavioral flows break that pattern. They route users based on state — what they’ve done and what they haven’t — rather than elapsed time. The result is a flow that moves faster when users progress and becomes more supportive when they stall.
Step 1: Define your activation moment
Before you build a single workflow, you need a north star. Your activation moment is the specific user action that predicts whether someone will retain.
It looks different for every product. For a project management tool, it might be creating and assigning a first task. For an analytics platform, it’s often connecting a data source and viewing a first report.
Pick one moment and make it concrete. "User engaged with the product" is too vague to build a flow around. "User connected their first integration" is actionable — it’s a specific event you can track and optimize toward.
One way to validate your activation moment: look at retention data. Do users who reached that moment in their first week retain at a higher rate than those who didn’t? If yes, you’ve found it — if the correlation is weak, dig deeper before you build.
Step 2: Map the steps between signup and activation
Once you know your activation moment, map the steps a user has to take to reach it. These are the milestones your onboarding flow will track and reinforce.
Keep the map to five or six steps. Each one should represent a meaningful user decision — something a user either does or skips. More than six usually means you’re tracking noise, not signal.
For each step, identify two things: the tracking event, and the friction point that stops users from completing it. That friction point is what each onboarding email needs to address. Write these down before you build anything.
Step 3: Instrument your events
Your flow is only as good as the data powering it. Each step in your onboarding map needs a corresponding event tracked and sent to your messaging platform.
Use a consistent naming convention from the start. An event like
onboarding_step_completed with a
step_name property is more useful than ten separate
event names. Every event should carry properties that make
personalization possible — plan type, role, company size,
referral source.
The most common mistake is firing events with missing or inconsistent properties. Agree on naming conventions before you instrument. Enforce them consistently — otherwise your segmentation breaks silently and without obvious warning.
Getting engineers on board early makes this easier. Share your event map with them before instrumentation starts — they’ll often surface properties you didn’t think to include. A short alignment conversation is cheaper than re-instrumenting three events after the flow is live.
Step 4: Design the flow logic
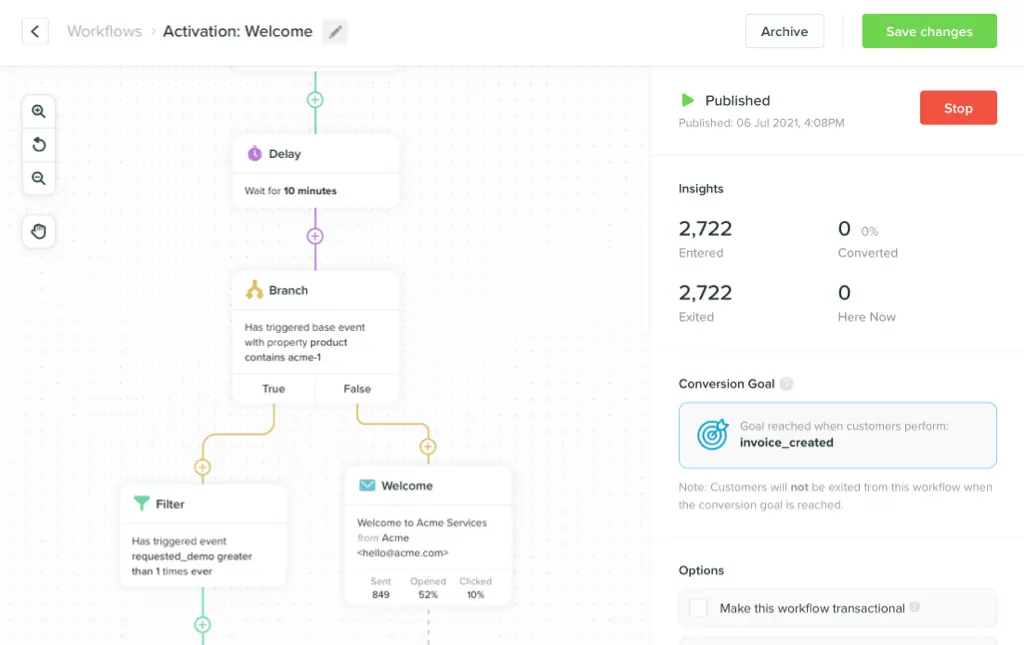
Every behavioral onboarding message follows the same four-part structure: trigger → condition → action → branch.
Set the trigger to fire on a specific event and filter for users who haven’t completed the next step. Define the action: email, push, or in-app message. Then add the critical branch — if the user completes that step before the message fires, exit the flow immediately.
That exit branch is not optional. Without it, users who self-serve still receive "here’s how to do the thing you just did" emails. That erodes trust — and trust is hard to rebuild once it’s gone.
Step 5: Set timing and delays
Timing shapes whether a message feels helpful or intrusive. A setup prompt sent five minutes after signup is noise. The same message sent four hours later — when a user has had time to explore and stall — is genuinely useful.
For email, a delay of two to six hours after a stall event is a reasonable starting baseline. For push or in-app, shorter delays work because the user is already in an active context. Test both rather than assuming.
Also think about send windows. Sending an onboarding nudge at 2am in the user’s timezone doesn’t hurt, but it’s suboptimal. Most messaging platforms let you configure send windows — use them.
Step 6: Write messages tied to the specific trigger
Generic copy on behavioral triggers is a waste. The trigger creates context. The email has to use it.
A user who completed account setup but hasn’t connected their first integration doesn’t need "Welcome aboard!" They need: "You’ve set up your account — here’s how to connect your first data source in under two minutes." Reference the specific step they’re on, and name the single next action you want them to take.
Subject lines follow the same rule. "You’re one step away from your first dashboard" outperforms "Get started with [Product]" every time. Specificity signals relevance before the email is even opened.
Keep the emails short. Most users skim onboarding emails rather than read them — they’re looking for the single action they need to take next. Write for the skim: one sentence of context, one bolded CTA, and a fallback link for users who want more detail.
Step 7: Handle stalls and drop-offs
Most onboarding flows are designed for the happy path. The harder — and more valuable — work is handling users who stall.
Identify your highest drop-off step: the one where the most users exit the flow without completing it. Build a dedicated recovery email for that step. Name the step, acknowledge the friction, and offer one concrete path forward — docs, a walkthrough video, or a direct reply.
Don’t wait too long to send the recovery email. A user who stalled on step two is still warm if you reach them within 24–48 hours. Wait a week and the mental context has reset — they’ve forgotten where they left off.
For users who don’t open any onboarding emails and haven’t activated, a plain-text fallback works well. A short note from a real person, asking what’s blocking them, can recover users that nothing else reached.
Step 8: Measure what matters
Don’t optimize onboarding emails for open rate. Optimize for step completion rate.
Track the percentage of users who complete each onboarding step after receiving the corresponding email. That’s the metric that tells you whether the message is actually moving people forward. Open rate tells you the subject line worked — step completion tells you the whole message worked.
Run A/B tests on one variable at a time — subject line, delay, copy, or CTA. Let tests run long enough to reach statistical significance before changing anything. Single-variable testing is slow and tempting to skip; it’s also the only way to know what actually worked.
Common pitfalls to avoid
Skipping the exit branch. If a user completes a step before the next email fires, suppress it immediately. Build this logic into every node before you launch — not after a user complains.
Loading day one with emails. The highest-value onboarding window is often day two through day five — after signup excitement fades and real friction sets in. Don’t over-message on day one and go quiet from there.
Using the same channel for everything. Email is best for guidance-heavy content with a clear CTA. In-app messaging outperforms email when the user is already active in the product. Match channel to context.
Building the whole flow before testing anything. Build one trigger, test it, and learn from it before adding five more. A focused flow that works beats a sprawling one that doesn’t.
Forgetting re-signups. If a user churns and returns, they should re-enter the onboarding flow. Make sure your trigger logic handles this case — don’t let returning users skip onboarding because the signup event already fired once.
Frequently asked questions
How many emails should an onboarding flow include? Between five and nine for most SaaS products. One email per key onboarding step, plus a re-engagement message for users who stall. More than ten usually means the flow is trying to cover too much ground at once.
Should I use a time-based sequence alongside a behavioral flow? You can — especially while you’re still getting full event instrumentation in place. But treat a fixed sequence as a temporary bridge, not a permanent solution. Behavioral flows consistently outperform time-based ones over time.
How do I handle multi-seat accounts? Build separate onboarding tracks for different user roles. Admins who set up the account have different activation goals than invited teammates. Sending admin-focused onboarding to a read-only invitee signals exactly the kind of inattention that behavioral flows are supposed to fix.
What if users aren’t opening any of my onboarding emails? Check deliverability first — low open rates can be a sender reputation issue, not a content problem. If deliverability is clean, test subject lines and reduce overall email volume. An in-app onboarding prompt may work better for users who don’t engage with email at all.
When should I start measuring performance? After 200–300 users have passed through each step. Below that, your sample size is too small for reliable conclusions. Set a review date in advance so you’re not optimizing on noise.
How do I prioritize which steps to email about first? Start with the step that has the highest drop-off rate. That’s where the most users are stuck, so it’s where a well-crafted message has the most leverage. Add steps from there, working outward from your activation moment.
Can behavioral onboarding emails work for free trials? Yes — free trial onboarding is one of the highest-ROI uses of behavioral email. Trial users have a deadline; every day they don’t activate is a day closer to churn. A well-timed nudge at a key drop-off point can be the difference between conversion and cancellation.
Build your onboarding flow with Vero
Disclosure: Vero is our own product. We’ve included it because we genuinely believe it belongs in this guide — but you should know we’re not a neutral party.
Vero is a multi-channel engagement platform built for product-led software teams. It connects directly to your data warehouse — Snowflake, BigQuery, Redshift, and others. That means you trigger onboarding emails on real product events without duplicating data into a separate CDP.
The visual journey builder lets product and marketing teams own onboarding workflows without waiting on engineering. Behavioral segmentation pulls from live event data and warehouse connections, so your audience conditions stay current automatically. Pricing is based on active profiles only — not total contacts — which keeps costs aligned with actual value delivered.
Start a free trial at getvero.com. No credit card required.