- All Posts
- /
- How To Setup An Automated SaaS Welcome Campaign in Vero
How To Setup An Automated SaaS Welcome Campaign in Vero
Other-
 Chris Hexton
-
Updated:Posted:
On this page
- Learn how to actually set up a series of emails that are sent to your customers throughout the trial of your software.
- See an example of a great upgrade email.
This is the first in a series of posts where we’ll walk you through the process of setting up a particular type of campaign.
Future posts will cover cart abandonment, HTML templating, deliverability, segmentation, and other juicy topics.
Each post will outline a practical, step-by-step approach to think about the problem at hand. Examples will be shown in Vero. You can get a free trial if you want to follow along.
These posts are here to educate and provide a best practice approach to email marketing.
1. Track sign up, free trials and subscription
The most important step when setting up a campaign to convert new trial users to paying customers is to track three things: 1. When they sign up 2. When their trial ends 3. When they subscribe to a paid plan
To track when a customer signs up you’d generally track the event on the welcome page after they fill out the form to start a free trial. For example, we do that on our ‘New here’ page:

Here’s the code we use:
It’s important to track how long a customer’s trial goes for and when the trial ends.
You can see in the code above that we track the length of the trial – this rarely varies but it gives us the flexibility to alter someones welcome campaign if we want to upgrade them to a 30 day trial as part of a promotion or similar.
Tracking subscription is as simple as adding a custom attribute called ‘plan’ with the value of the plan the customer is on. To start out with, all users are on a free trial.
For good measure, you should include the information in the header of your SaaS application on every page if your customer is logged in: that way you can capture any updates to the attributes, such as a change in plan.
2. Setup a campaign that triggers when they sign up
To maximize free trial to paid conversions you should start emailing customers the moment they sign up.
The first step in this process is to create a segment that separates paying customers from non-paying customers as you generally won’t continue sending your welcome series to customers that become engaged and subscribe.
Here’s how to create a segment that contains only non-paying customers:

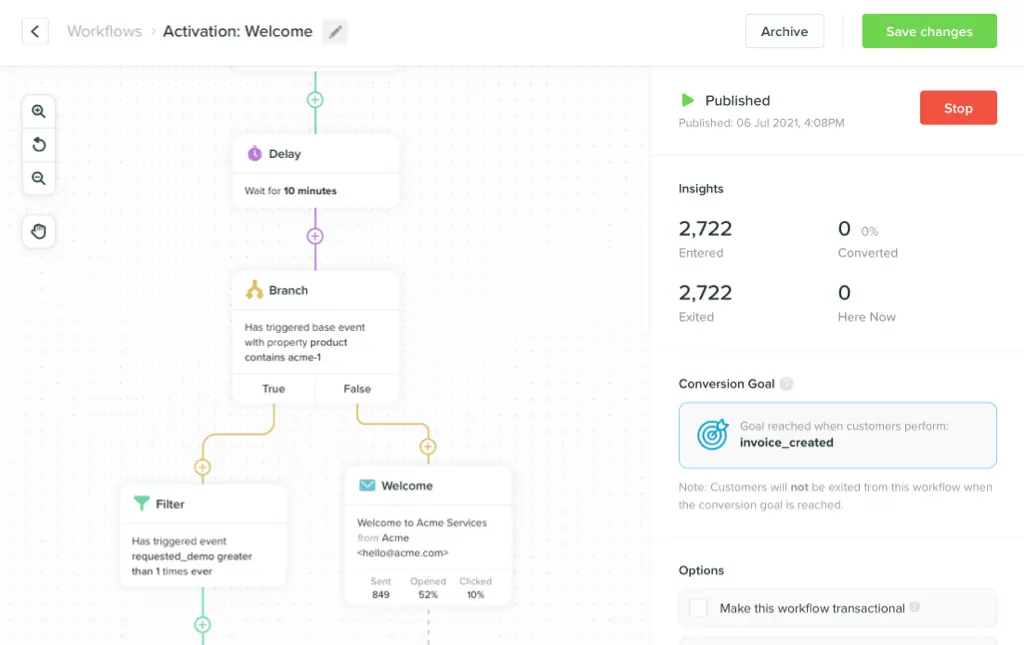
With that setup, creating a campaign to educate new customers is a breeze. Here’s how you configure the first campaign in your welcome series to go out 10 minutes after signup:

You’ll notice the filter to ensure customers only receive this email if they’re not paying. This is not so important in the first 10 minutes but, as you add emails to your series campaign it becomes extremely useful.
After adding a subject line and somebody copy simply hit ‘Save’ and your campaign will be saved as a draft.
3. Adding emails in series
Adding emails in series over the course of your customers’ free trial period is the smart way to increase your activation and conversion rates.
Coming up with 3-5 quality emails educating customers about the functionality of your product and what they can achieve is what you should focus on.
To set these emails up, simply Select the ‘Add email’ button at the top right of the campaign snapshot view:

Follow the same process as step two to set up the email subject and copy for the second email in your series. Add the same filters as before, to ensure your customer only receives this second campaign if they haven’t yet converted.
Here’s how it might look:

Each email is triggered relative to the email before: this makes it really easy to know what customers will get next and when they will get each email.
After saving your email you’ll have something like this:

4. Going live
After you’ve added a few more campaigns to your series, sent yourself some previews and are ready to launch your campaign you need to follow the following steps.
Click the ‘Launch campaign’ option next to your draft campaign:

The launch screen gives you an overview of who the first email in the series will target. The tick box to ‘Queue emails for the X users that already match these conditions’ will schedule emails for customers that meet the conditions at this point in time.

In this case, if someone had triggered ‘Signs up’ 8 minutes ago and we selected this tick box an email would be queued up to be sent to them in 2 minutes (i.e. 10 minutes after they signed up). Generally, you’d leave this box unticked and use our newsletters feature to send emails to customers that have previously met conditions!
The screen also shows you the basic code you need to have on your site to track the event that triggers the campaign. We covered this back in step one but it’s handy to have it here if you need it.
Once you’re ready – hit ‘Launch’ and you’re off!
Bonus – a great example of an upgrade email
One of the most important emails in your welcome series is the email asking your customers to upgrade.
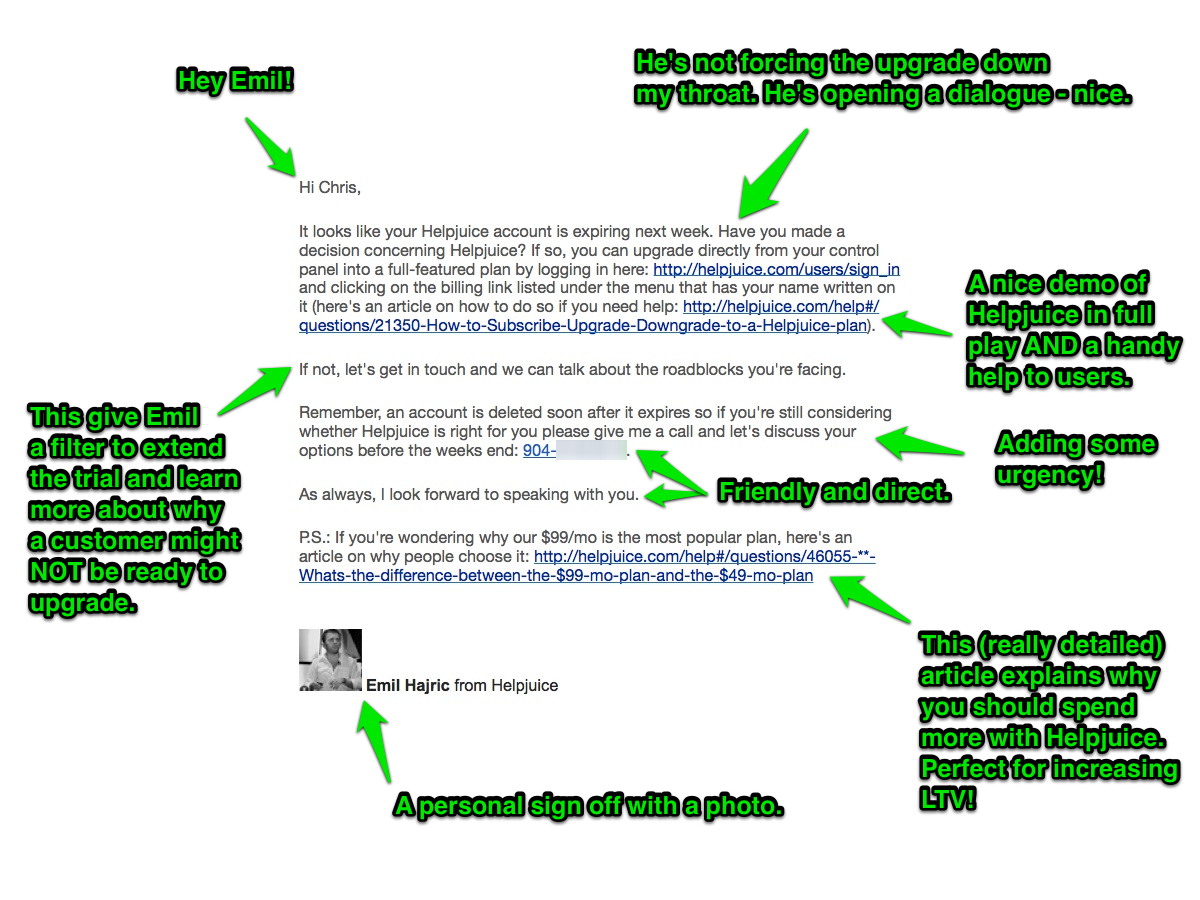
Here’s a great example from the guys at Helpjuice:
 .
.
The reason this campaign is awesome:
- There is a choice. If you’re not ready to upgrade then he recommends giving him a call. This is much warmer than the usual copy that goes along the lines of “Upgrade your account today or we’ll delete it!”
- They provide a good case for choosing a higher plan ($99/month) by linking to a very informative article on the positives of doing so. They also get to show off their own product in this way (as that’s where the article is hosted).
- The email has a personal tone and includes a photo of the founder himself. This approach goes a long way and being personal helps build trust as you share your story and your persona with your customers.
Try it out
To set up a welcome campaign just like this and leverage the tips here, get your hands on a Vero free trial account. 14 days free, no credit card required.
Got questions? Leave them in the comments and I’ll get right on them!