- All Posts
- /
- Setting up abandoned cart emails with Vero Workflows

Setting up abandoned cart emails with Vero Workflows
Messaging and Automation-
 Chris Hexton
-
Updated:Posted:
On this page
This tutorial shows you how to set up an abandoned cart email, but you can adapt these steps to create any automated email campaign based on customer interactions with your application and/or website.
In this tutorial, learn how to:
- Track customer activity
- Track and store data to personalize emails
- Create a multi-step messaging workflow
This tutorial requires interacting with Vero’s API. It guides you through tracking an ‘event’ via the API, storing data on a customer’s profile, and inserting personalized data into an email.
To get the most out of this tutorial, you should be familiar with copying and pasting API calls into a terminal window, and open to learning some Liquid templating language – or talk to data engineer for guidance.
1. Tracking customer activity (‘events’) on your website/app
For those unfamiliar, ‘event tracking’ is a method of capturing user activity. ‘Events’ are a record of user interactions with various website and app features. Rather than tracking page views, ‘events’ enable you to track specific actions.
Examples of events typically recorded by ecommerce businesses include:
- Added product to wishlist
- Added product to cart
- Viewed cart
- Started checkout
- Completed checkout
Customer data platform, Segment provides a detailed spec of ecommerce events – a good starting point for defining the events you want to track for your store.
‘Events’ are a powerful way of tracking user behavior. Vero’s APIs enable you to track events for customer lifecycle activity. These events can be used to automate virtually any customer messaging workflow.Learn more about Event tracking.
Set up event triggers for an abandoned cart email
For abandoned cart emails, you need to track two key events:
- Checkout started (
checkout_started) - Checkout completed (
checkout_completed)
These events can be tracked using Vero’s API. We have a number
of API libraries that make it easier to interact with our API in
languages such as Javascript, Ruby, PHP. For this example, we’re
going to use simple "cURL" commands that you can
copy and paste into a terminal on your computer.
All of the documentation regarding our API is available in our API Reference.
To track the first test event (checkout started), copy and paste
the snippet below into your terminal. Before you do this, make
sure you replace "auth_token" with a valid
Authentication Token from your
Vero account.
You can find your Authentication Token(s) under
Settings > Project, and replace the
"id" and "email" with the id and email
of a test user in your account.
curl -H "Content-Type: application/json" \
  -X POST https://api.getvero.com/api/v2/events/track \
  -d '{
    "auth_token": "ZTUwNTI3NDcxNGZiYmRiMmYxZGFmMWUzYzdmODUzOTkxYzI4NWEzYzoyYTdiMDczNjk3MGVmOGQyNTBkZDQ3NmI5MDMzZmZhYWRlNWY2YWVm",
    "identity": {"id": 1234, "email": "test@getvero.com"},
    "event_name": "checkout_started"
  }'
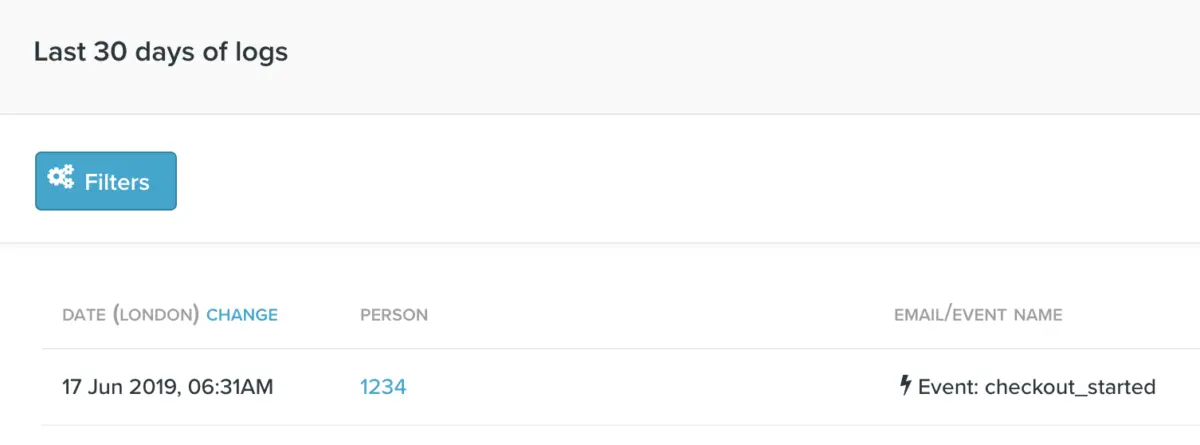
To check this has worked, select Logs in your Vero account, and confirm the new event is displayed in the Log history.
To send cart abandonment emails in production, you will need to ensure you track the Checkout started event when the user begins the checkout process. This can be done using any of our API libraries, the key is that the event is triggered at the right time.
You will also want to track the Checkout completed event when the user successfully completes the ordering process, typically done on the confirmation or Thank you page.
Here’s an example of how you would track the Checkout completed event:
curl -H "Content-Type: application/json" \
  -X POST https://api.getvero.com/api/v2/events/track \
  -d '{
    "auth_token": "ZTUwNTI3NDcxNGZiYmRiMmYxZGFmMWUzYzdmODUzOTkxYzI4NWEzYzoyYTdiMDczNjk3MGVmOGQyNTBkZDQ3NmI5MDMzZmZhYWRlNWY2YWVm",
    "identity": {"id": 1234, "email": "test@getvero.com"},
    "event_name": "checkout_completed"
  }'
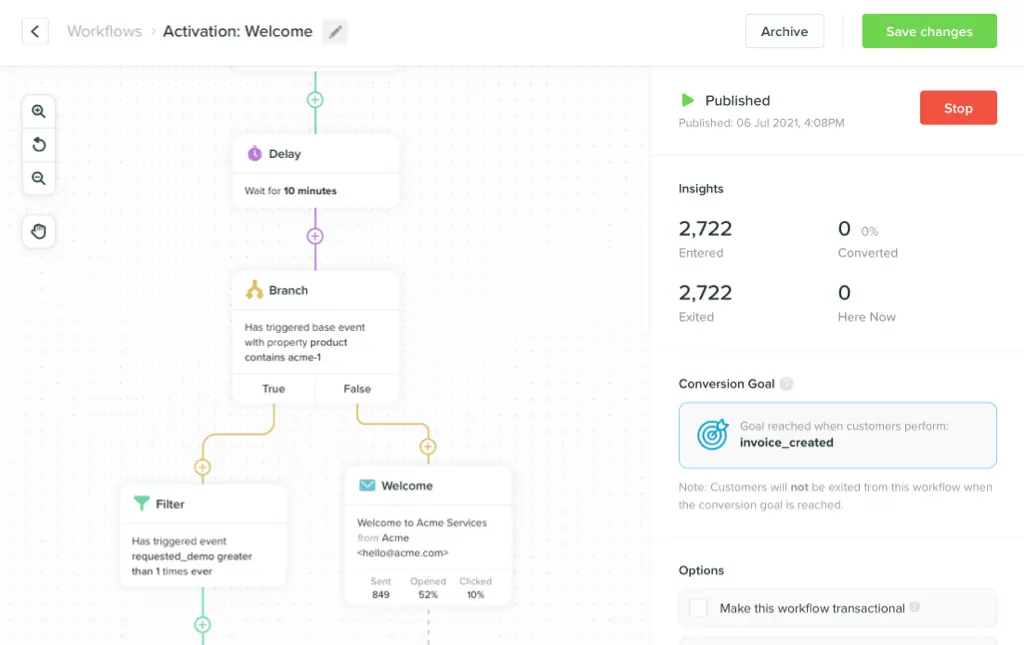
2. Build an automated email workflow
Now that customer activity is being tracked, we can create a workflow to automatically send customers an email to remind them to complete the checkout process.
Workflows allow you to create powerful automations to reduce busywork and co-ordinate your customers’ journey and experience with your business.
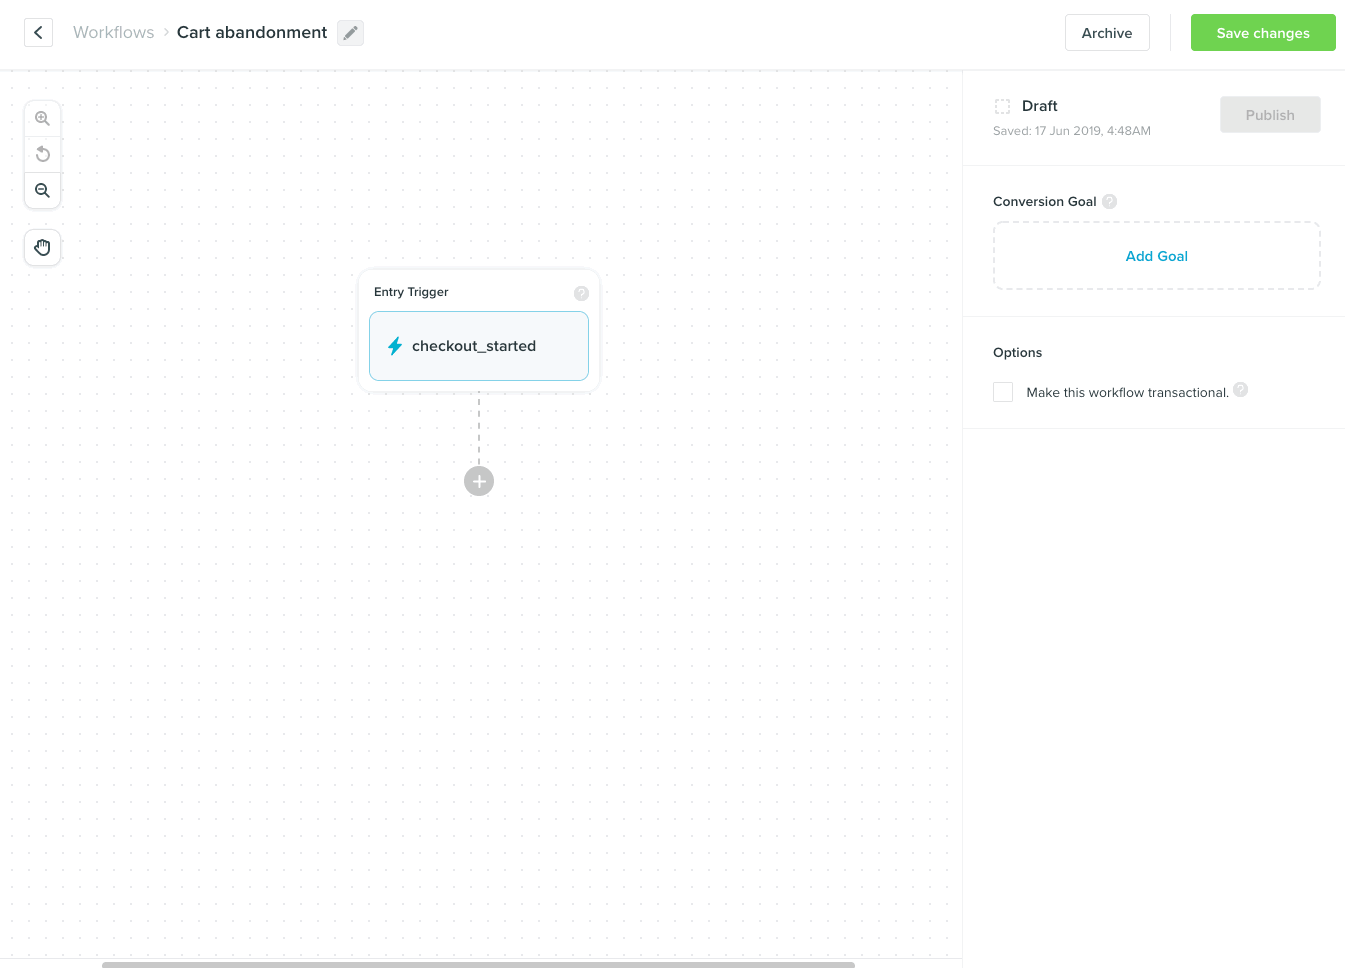
To begin, create a new workflow in your Vero account and add the entry trigger. The entry trigger for a Workflow is an ‘event’, so we’ll use the Checkout started event.
Each time a customer triggers the Checkout Started event, they will enter the first step of the workflow. Using this Workflow, we can configure an email to automatically send when a customer abandons a cart.
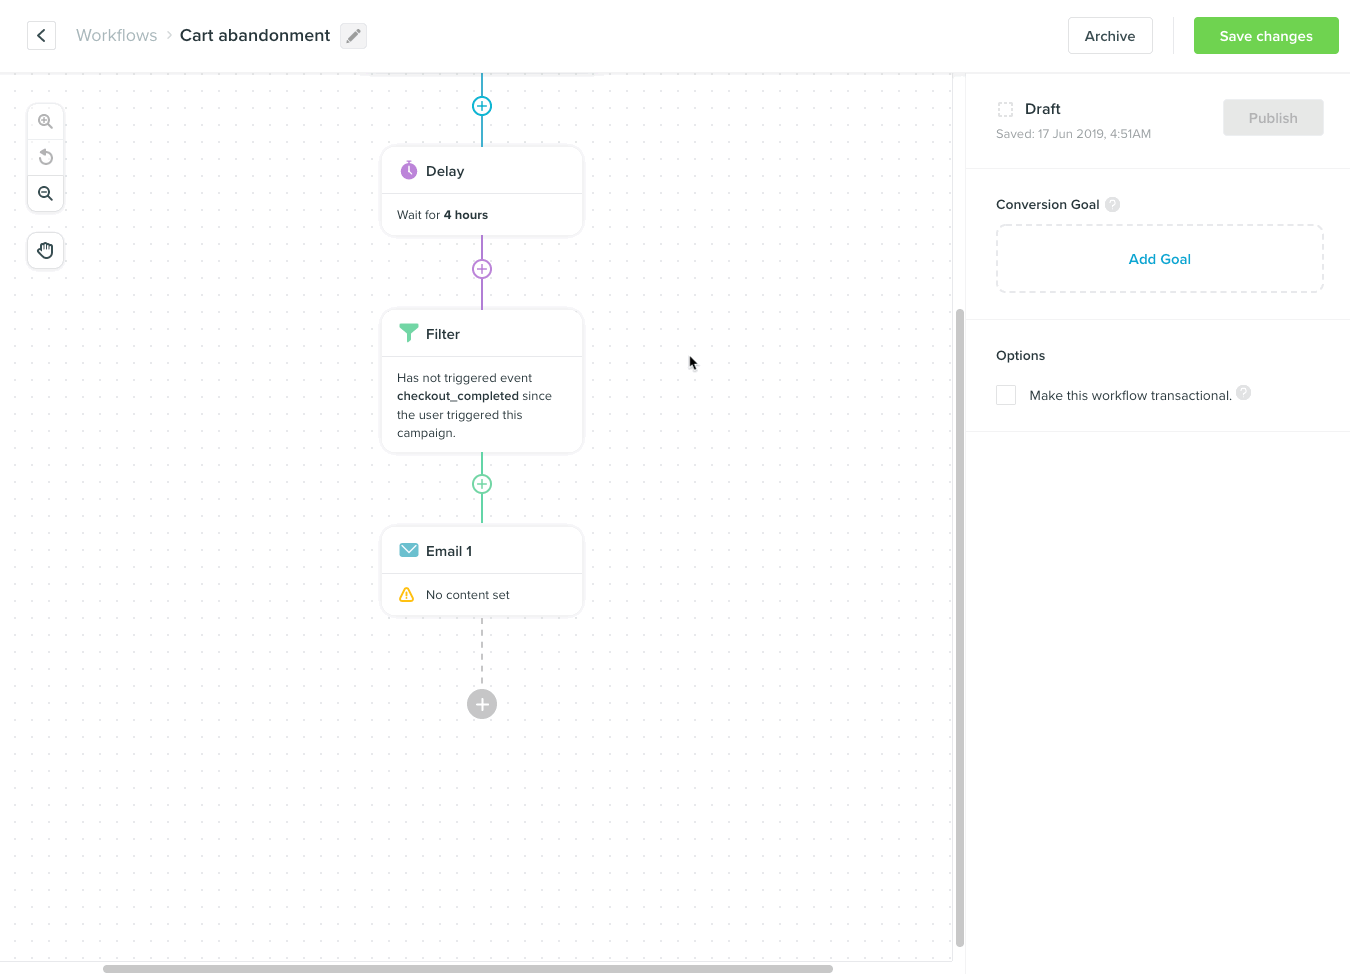
To do this, add a Delay step to the Workflow – for this example, we’ll use a delay of four hours. After this period of time has lapsed, Vero will progress the customer to the next step in the workflow.
Next, add a filter with the condition ‘User has not triggered event Checkout Completed’ to remove any customers who have completed the checkout process since starting this workflow.
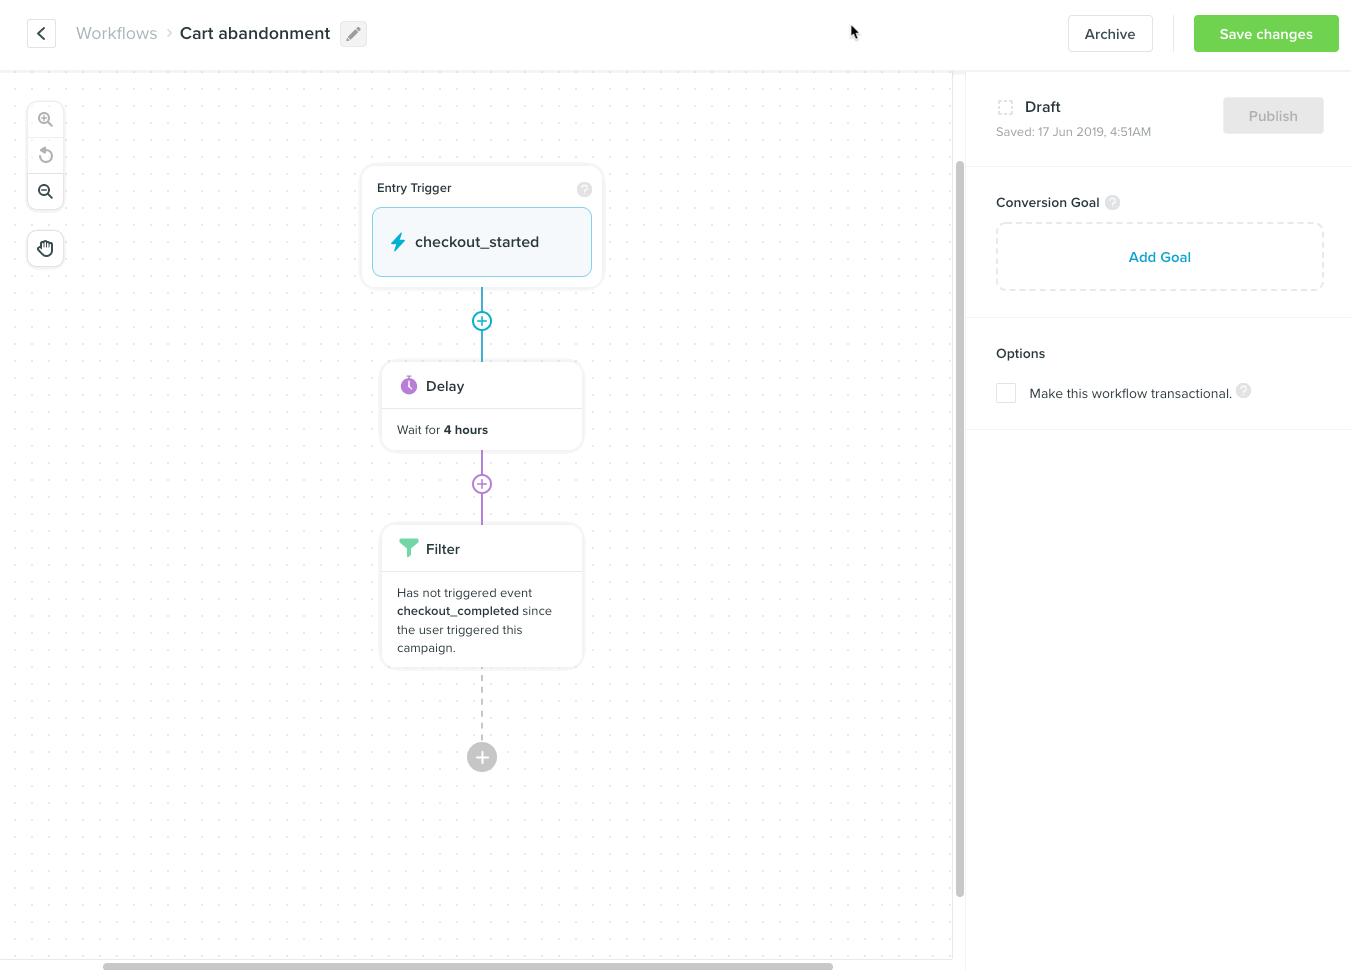
The final step is to add an Email to the Workflow. This email will only be sent to users who pass through the Filter step of the workflow. In the next step, we’ll create the content for the email.
To recap what happens in our new Workflow: every time a user triggers Checkout started, they will enter this Workflow. At this point, Vero will pause for four hours and, after this time, filter out any users who have triggered the event Checkout completed. Users who pass through this filter will then receive an email.
3. Define the content for your abandoned cart email
Vero enables you to store details of the items in your customers’ shopping carts so that you can include this information in the email content.
Step 1. Tracking cart data for personalization
We recommend storing this data as a user property in Vero – a dynamic field you can use to store data about your customers.
To add a property to a customer profile you can again use Vero’s API. In this case, you want to modify and add to the Checkout started event that we defined above.
Here’s an example of the updated code. Note the addition of the
"cart" property within the
"identity" block (don’t forget to change the
"auth_token" value as we did before).
curl -H "Content-Type: application/json" \
-X POST https://api.getvero.com/api/v2/events/track \
-d '{
"auth_token": "ZTUwNTI3NDcxNGZiYmRiMmYxZGFmMWUzYzdmODUzOTkxYzI4NWEzYzoyYTdiMDczNjk3MGVmOGQyNTBkZDQ3NmI5MDMzZmZhYWRlNWY2YWVm",
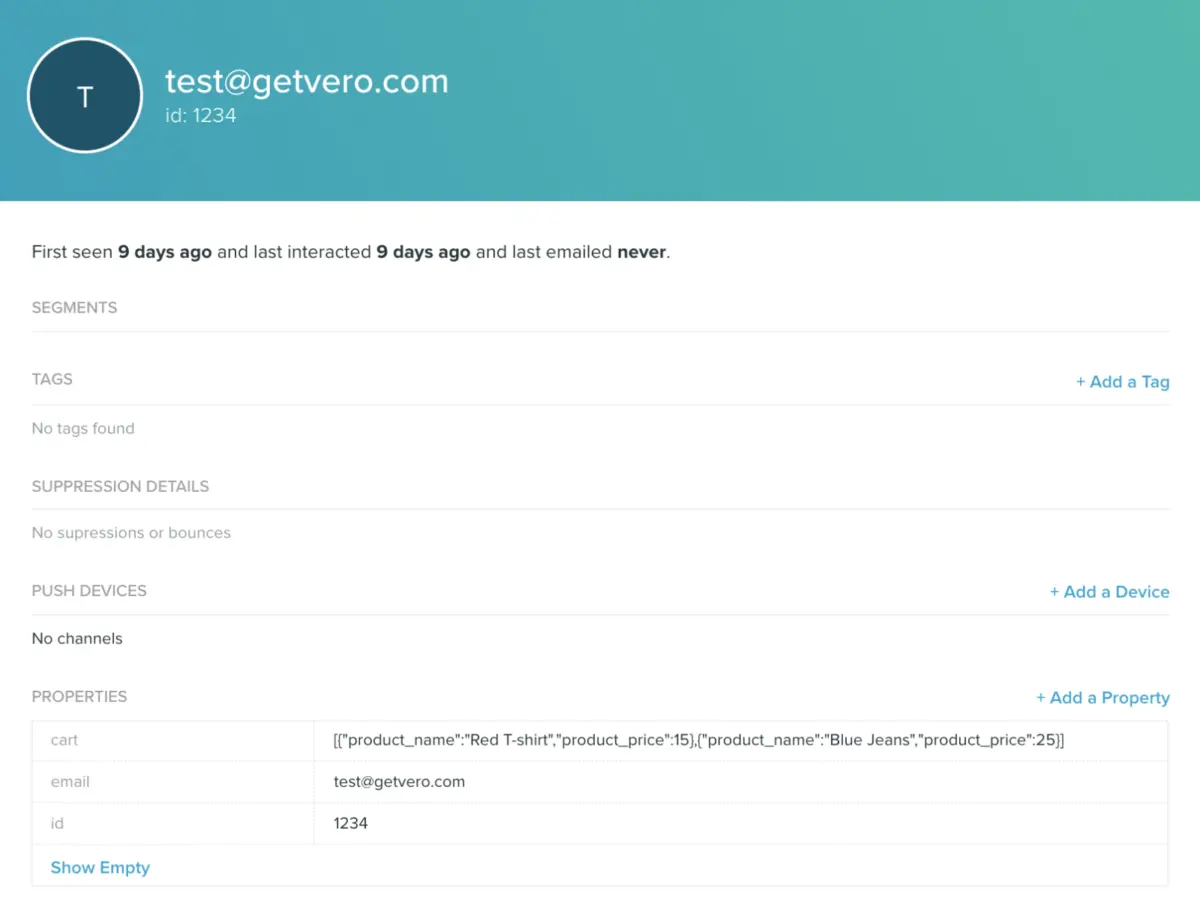
"identity": {"id": 1234, "email": "test@getvero.com", "cart": [
{"product_name": "Red T-shirt", "product_price":15},
{"product_name": "Blue Jeans", "product_price":25}
]},
"event_name": "checkout_started"
}'
Note that we’re storing this data as an array of hashes so that you can iterate through and use each item in the array when personalizing your messages.
You can create or update any user property inside the
"identity" block when tracking an event.
You can also update customer properties directly (without
tracking an event) using the "identify" API call.
Learn how to do this in our
API Reference.
To test out this API request, copy and paste it into a Terminal, as before. Then, go to your Vero account and search for the test user. View their customer profile and confirm that the "cart" property has been correctly updated.
Step 2. Adding email content
With the items in your customers’ carts being recorded, you can now use this data to create personalized emails.
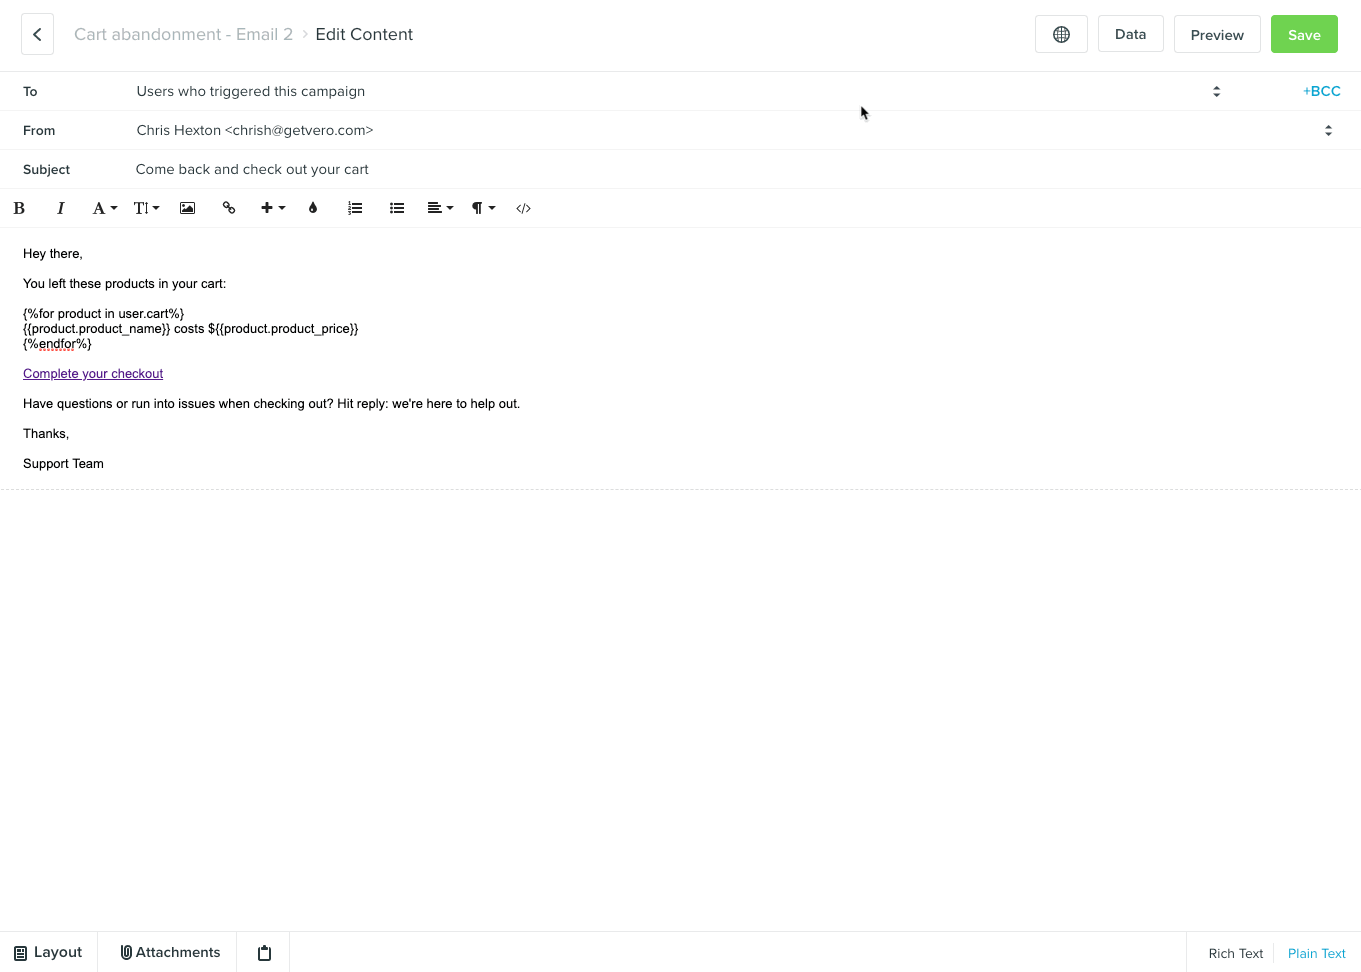
To do this, head back to your workflow, select the Email step > Add Content. This will take you to Vero’s content editor where you can add your message.
To personalize the content of your email, select the Data Inspector feature at the top-right of the editor.
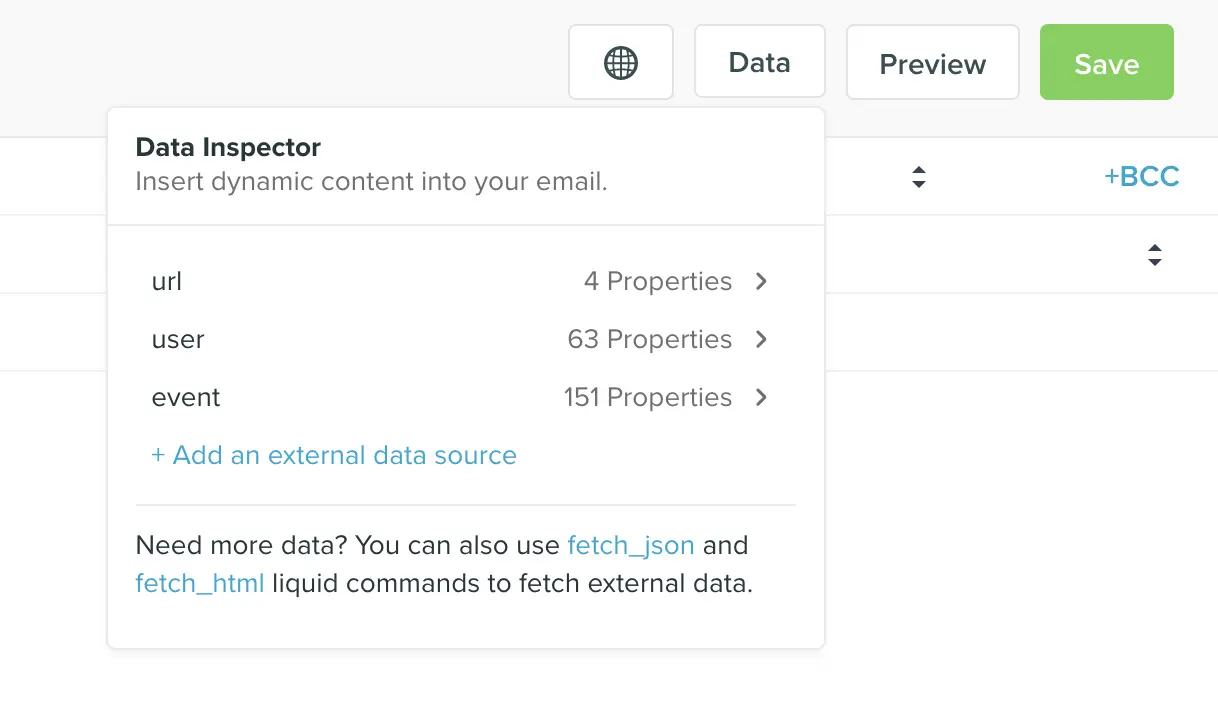
This will provide Liquid templating tags for all the data you track in Vero. Simply copy and paste the tags into your email to create dynamic content.
Just before the email is sent, the Liquid tags will be replaced with the customer data stored in Vero.
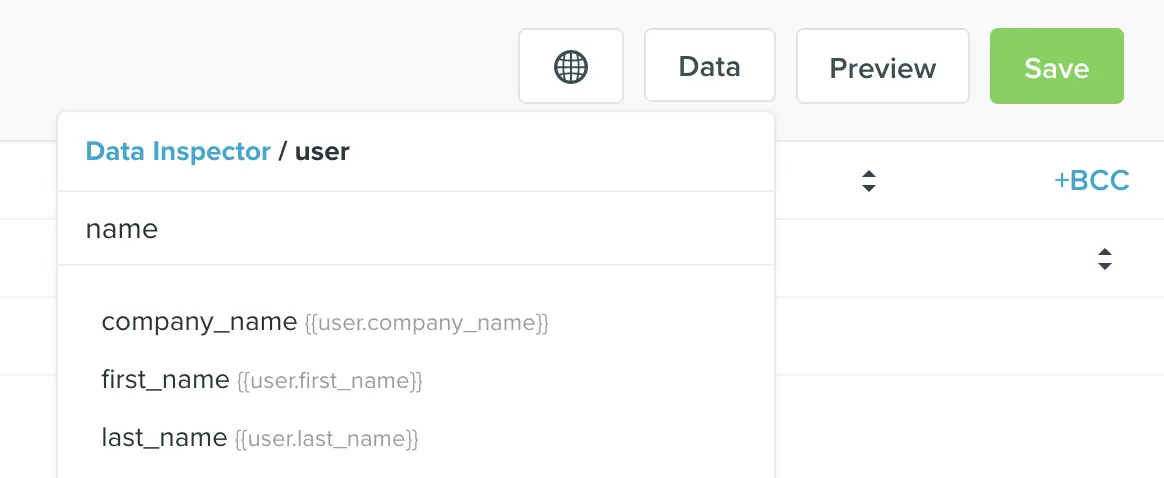
In this example, we have stored the data we want to access under
the "cart" property, as an array of hashes. To
access this data, we’ll use the user properties with the
{{user.____}} prefix in Liquid.
Using one of Liquid’s more advanced features, we can iterate through the array and insert data about each product in the customer’s cart.
The data we tracked earlier to the "cart" property
on the user profile is stored as an array. Using Liquid you can
loop through this array and, for every entry in the array (i.e.
for every product in the customer’s cart), insert the dynamic
data about that product.
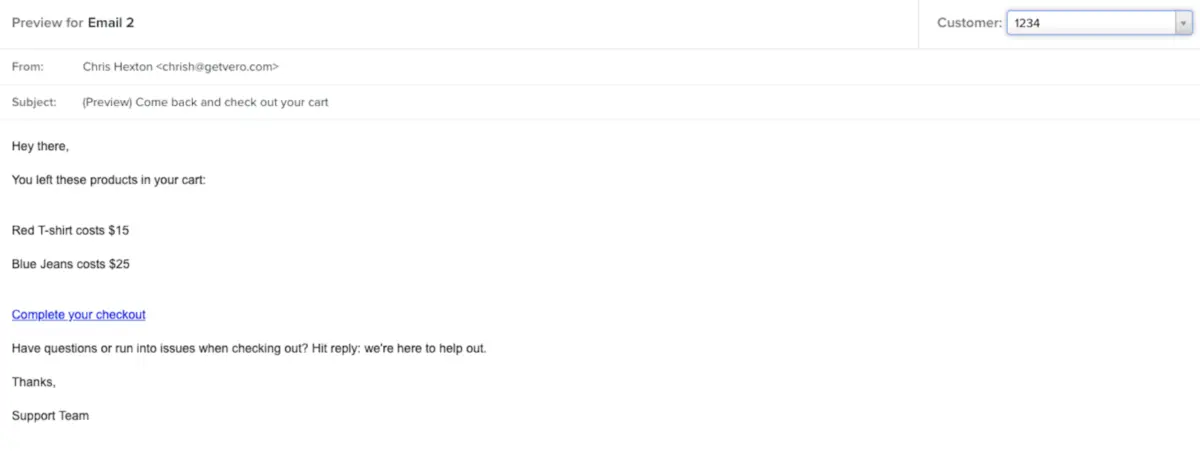
In the example below, you can see that we loop through
{{user.cart}}, temporarily assigning each entry in
the array to the variable "product". As we tracked
an array of hashes in the "cart" property, for each
entry we can access the full properties of that hash. As per the
example below, we reference the "product_name" and
"product_price" properties of each hash.
When rendered, the Liquid variables will be replaced with the data from the user’s property.
4. Launch your abandoned cart email workflow
Having successfully set up the email, save and exit back to the workflow. From here, you can preview your email for your test customer profile and ensure the data renders correctly.
With everything configured, you can now ‘Publish’ your workflow to make it live.

Customers who trigger the Checkout started event will enter the abandoned cart email workflow, and their data will be evaluated at each step to ensure they receive the correct journey.
Success!
You’ve set up your abandoned cart email automation. You can use this workflow as inspiration for other steps in your customer lifecycle where messaging will help you drive user engagement and conversion.